


A few days ago I've posted RE category write-ups from the KnightCTF 2023. Another category I've looked at – quite intensely at that – was forensics. While this blog post isn't a write-up for that category, I still wanted (and well, was asked to actually) write down some steps I took to make Volatility work with MEMORY.DMP file provided in the "Take care of this" challenge series. Or actually steps I took to convert MEMORY.DMP into something volatility could work with. I have to add that I didn't get the flags for these challenges*, so again, this isn't a write-up.
* It turned out that the flags weren't based on the MEMORY.DMP – the sole resource provided – at all due to an oversight in challenge creation. It was a pretty amusing situation we've learnt about after the CTF, but what can you do.
Let's start by stating the problem: neither Volatility 2 nor Volatility 3 were able to use MEMORY.DMP as input. WinDBG on the other hand had no issues at all, so we knew the file was correct.
$ python2 vol.py --profile Win7SP1x64 -f ../MEMORY.DMP pslist
Volatility Foundation Volatility Framework 2.6
No suitable address space mapping found
Tried to open image as:
 MachOAddressSpace: mac: need base
 LimeAddressSpace: lime: need base
 WindowsHiberFileSpace32: No base Address Space
 WindowsCrashDumpSpace64BitMap: No base Address Space
 WindowsCrashDumpSpace64: No base Address Space
...
If you're unfamiliar with Volatility, it's an open-source forensics framework written in Python 2 and Python 3 respectively, which allows an investigator to run queries on computer system's memory dumps. Technically it understands internal Windows and Linux kernel memory objects and can walk through them to do stuff like listing running processes, dumping console buffers or the content of the clipboard, digging through the registry (it's in-memory version), etc. See this example for instance. Pretty neat tool!
Some theory on how Volatility works
As said, the input is a system memory dump. These however come in different shapes and sizes, depending on how one might have acquired it. For example, the one common source is a Blue Screen of Death-time automatic memory dump creation – it's usual purpose is to allow folks to put it in WinDBG and figure out why the system crashed. Another typical example includes providing a raw dump of physical memory – these can be acquired in a multitude of ways, though they don't really include any useful metadata (will get to this later). Either way, usually what you get is a dump of physical memory – physical being the keyword here.
Physical memory however won't do. That's because the great majority of the kernel structures – as well as literally everything in user-land – operates on virtual memory. So the first thing volatility has to do is basically load the proper parser for the given input format and then provide a virtual memory view for it. This can of course be done easily based on the page table structure which maps virtual addresses to physical addresses.
One important thing to note here is that there isn't just one page table structure in memory. There are a lot of them – usually one per process, though in some cases even each thread might have one. That's OK however, since even if you find only a single page table in memory you'll be able to access the process/task/thread list, and these in turn hold physical addresses of their respective page tables. This means that each process/task/thread "sees different things" in memory, though usually at least the kernel part is seen by all of them in the same way.
Once Volatility has a virtual memory view it can proceed to do the required analysis by finding and walking through the aforementioned kernel structures. Of course each kernel version might have a bit different looking internal structures – this is best observed either on ReWolf's Terminus project website (_EPROCESS example) or Svitlana Storchak's / Sergey Podobry's Vergilius project website (_EPROCESS example again). To handle these differences Volatility 2 uses per-version profiles, which in turn refer to vtypes – these are kernel structure definitions in Python form:
ntkrnlmp_types = {
...
'_EPROCESS' : [ 0x4f8, {
  'Pcb' : [ 0x0, ['_KPROCESS']],
  'ProcessLock' : [ 0x160, ['_EX_PUSH_LOCK']],
  'CreateTime' : [ 0x168, ['_LARGE_INTEGER']],
...
In case you're missing a profile for a Windows version and want to use Volatility 2, you can use the pdb_tpi_vtypes.py script from pdbparse to get them. Note that you will need the PDB (debugging symbols) file for kernel in question, but just loading a MEMORY.DMP into WinDBG will automatically download it for you (hint: setup on-disk cache so it's actually saved on disk). Then just run something like:
pdb_tpi_vtypes.py ../../../ntkrnlmp.pdb/DADDB88936DE450292977378F364B1101/ntkrnlmp.pdb > win7_sp1_x64_24214_vtypes.py
and you have vtypes ready to go. Note that you need to copy the vtypes in the proper directory (volatility/plugins/overlays/windows/) and tweak profile files a bit to make sure these are actually used. E.g. in this case that would amount to adding the following class in volatility/plugins/overlays/windows/win7.py (yes, you need Volatility 2's source code):
class Win7SP1x64_24214(obj.Profile):
    """ A Profile for Windows 7 SP1 x64 (6.1.7601.24214 / ???) """
    _md_memory_model = '64bit'
    _md_os = 'windows'
    _md_major = 6
    _md_minor = 1
    _md_build = 7601
    _md_vtype_module = 'volatility.plugins.overlays.windows.win7_sp1_x64_24214_vtypes'
    _md_product = ["NtProductWinNt"]
Other changes might also be needed – I didn't explore this fully since it turned out in my case other profiles from "nearby" versions also work well enough (I ended up using plain old Win7SP1x64).
In Volatility 3 the vtypes are kept in JSON files generated from PDBs using volatility3/framework/symbols/windows/pdbconv.py script. I can't tell you much about this though, since pdbconv.py refused to work with ntkrnlmp.pdb I had and I decided not to fall into the rabbit hole of fixing PDB parsing.
The incompatible MEMORY.DMP
One thing to note is that the Windows memory dump format isn't really officially documented. The modus operandi seems to be that Microsoft programmers tweak the format at will, but implement its support in DbgHelp library (dbghelp.dll) for third parties to use. This of course means that the DbgHelp is not available on Linux, at least not in a straight forward fashion*. Given this, tools like Volatility have to implement their own Windows memory dump parsers – and these by definition are bound to play a catch-up game.
* Technically (i.e. ignoring any potential licensing issues which might or might not exist) there would be at least two ways to use dbghelp.dll directly on x86 Linux – either write a thin wrapper-service on it and run it through Wine, or use one of Tavis Ormandy's hacks or something similar to use it directly.
So my guess is that the incompatibility is the result of just this catch-up scenario, with the legacy Volatility 2 not having implemented some new variant of internal MEMORY.DMP structures. On the flip side it might just be that the kernel-memory-only dump used in this CTF challenge is unpopular enough that Volatility 2 just never had to support it.
Either way, the big question is: what do we do about this?
The first step is always to understand the problem. In this exact case it meant trying to compare the memory dump format specification with MEMORY.DMP file at hand. Oops, there's no specification available. So we take the next best thing – source code of the parser in Volatility 2.
I actually found two parsers in Volatility 2:
- volatility/plugins/addrspaces/crash.py
- volatility/plugins/addrspaces/crashbmp.py
So apparently there are two variants of Windows memory dumps supported – a non-bitmap one and a bitmap one (I'll get to the differences between them in a second). That's actually not fully true, since actually there are three variants in total, as the non-bitmap variant supports both 32- and 64-bit systems, while the bitmap variant supports only 64-bit systems:
- WindowsCrashDumpSpace32
- WindowsCrashDumpSpace64
- WindowsCrashDumpSpace64BitMap
In any case the high-level file structure looks something like this:
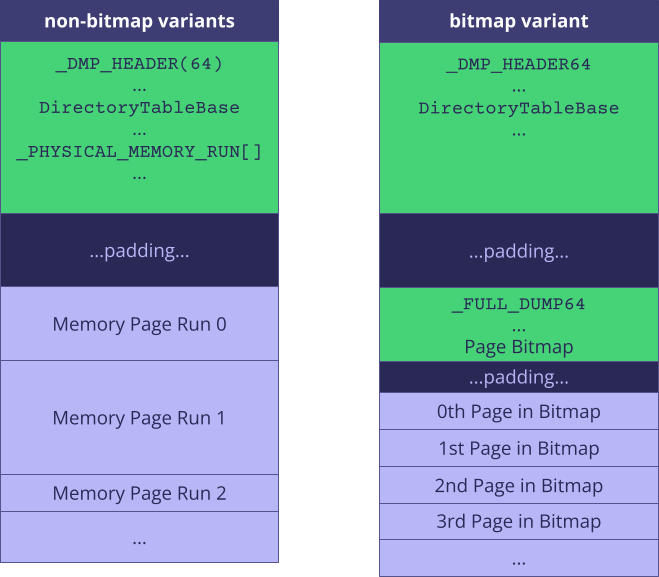
The _DMP_HEADER and _DMP_HEADER64 definitions can be found in volatility/plugins/overlays/windows/crash_vtypes.py, while the _FULL_DUMP64 is defined in crashbmp.py itself.
The non-bitmap variants use a _PHYSICAL_MEMORY_RUN array, which is technically embedded inside another structure called _PHYSICAL_MEMORY_DESCRIPTOR – both defined in profile-specific vtypes file inside the volatility/plugins/overlays/windows/ files. This array contains information about "runs", i.e. continuous physical memory regions dumped into the file. If the whole physical memory was dumped, then it's just 1 run starting at 0 with run size that of the full physical memory. However since usually full dump are both impractical and unnecessary – e.g. there is no need to dump GPU VRAM regions – some regions are split into multiple runs that skip the unnecessary areas.
The bitmap variant is basically the same idea, but at page (0x1000 bytes aka 4KB) granularity. Instead of having memory split into continuous "runs", we deal with a bitmap (as in literally an array of bits) which answers the question of whether the Nth page is present in the dump file (Nth bit set to 1) or not (Nth bit cleared to 0).
Having learned this from Volatility 2's source code, I started comparing it with the MEMORY.DMP at hand. What I found out is that while _DMP_HEADER64 did look correct, something else was broken down the line. Initially I though that it was just a matter of _DMP_HEADER64.DumpType set to an incorrect value, but nothing is ever that easy. Eventually I figured out that what I'm dealing with is a 64-bit version of the crash dump header, with a 32-bit version of the bitmap variant following down the line. This became obvious due to two things I've observed:
- When comparing individual pages in WinDBG, page by page, there were a lot more gaps than the _PHYSICAL_MEMORY_RUN[] would suggest. Also, memory pages in the file started much further than expected. So this had to be a bitmap variant.
- The data in the MEMORY.DMP I had – when interpreted as _FULL_DUMP64 – just made no sense.
Note that this isn't even the "missing 32-bit bitmap" variant, since this is indeed a 64-bit bitmap variant, just one that isn't using _FULL_DUMP64 structure, but rather some mythical _FULL_DUMP?32?*.
* Actually – as I found out while writing this blogpost – it turns out that when searching for _FULL_DUMP32 you can find it on GitHub in a file called ntiodump.w or ntiodump.h, which apparently is part of Windows 2003 / NT SDK. It's followed by a _SUMMARY_DUMP32 structure, which is pretty close if not identical to what I derived during the CTF. I haven't found it during the CTF though.
All this means I had to start with two things: making sure this really is a bitmap variant and reverse-engineering the structure enough to be able to add support for it in Volatility 2. The part of the file I focused on looked like this:
00002000  53 44 4d 50 44 55 4d 50  53 44 4d 50 00 70 02 00  |SDMPDUMPSDMP.p..|
00002010  00 00 12 00 20 fb 00 00  00 00 12 00 53 44 4d 50  |.... .......SDMP|
00002020  28 c0 e8 03 80 fa ff ff  fe 00 00 00 00 00 00 00  |(...............|
00002030  00 00 00 00 00 00 00 00  00 00 00 00 00 00 00 00  |................|
00002040  00 00 00 00 00 00 00 00  3f 00 00 00 00 00 00 00  |........?.......|
00002050  00 00 00 00 00 00 00 00  00 00 80 7f 80 08 00 00  |................|
00002060  00 e0 ff 01 ec 0f 00 00  00 00 a0 80 00 00 00 00  |................|
Two things immediately stood out:
- Well, obviously the magic values SDMPDUMPSDMP and SDMP magic values marked in green above.
- On top of that I noticed the bytes 00 70 02 00, or rather – if treated as a 32-bit little endian value – 0x27000. I already knew at this point from my WinDBG experiments that the actual memory data in the file starts at that offset (remember the "Also, memory pages in the file started much further than expected." sentence?).
The next 12 bytes interpreted as 32-bit little endian gave the following three values: 0x120000, 0xfb20, 0x120000. Now what could this be?
Just thinking about what's actually needed to parse the bitmap should give you a clue: you need the overall size of the bitmap. Since I knew this header was at 0x2000 and I knew the data started at 0x27000, this left about 0x25000 (minus header) bytes for the bitmap at most. Well, neither 0x120000 nor 0xfb20 is close to that value. But wait, this is actually a bitmap, so it would make sense for the size to be expressed as bits. And, to no-one's surprise, it turns out that 0x25000 * 8 bits per byte gives you 0x128000, which is suspiciously close to 0x120000. Given this I've assumed it has to be the bitmap size in bits. Why does this value appear twice though? No idea, but it also doesn't really matter.
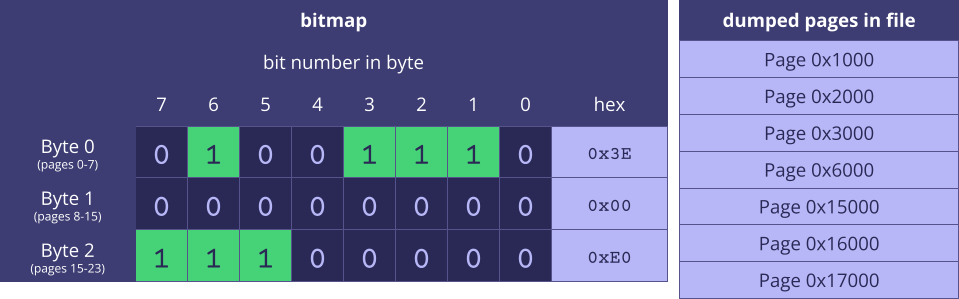
What about 0xfb20? My suspicion here was that it is the number of actual pages in the dump file / number of bits set in the bitmap (same thing). This can be verified either by going through the whole bitmap or by comparing the file size (263505368 bytes) minus headers to 0xfb20 pages. So that's 263505368 - 0x27000 = 263345624 on one side and 0xfb20 * 0x1000 = 263323648 on the other. That's pretty close – enough to assume this hypothesis is confirmed. Where does the difference between these values come from? It turns out there are some additional structures at the end of the file, though these aren't important.
Now for the bitmap itself. I already knew from WinDBG that page at 0x0000 didn't exist and I knew that the next 7 pages did exist, and that there was a large gap after that. So this would be either 0b11111110 (hex 0xfe) or 0b01111111 (hex 0x7f), depending on whether the bitmap uses MSB-first or LSB-first approach (that's Most-Significant-Bit-first, i.e. bit 7 denotes page 0, or Least-Significant-Bit-first, i.e. bit 0 denotes page 0). At offset 0x2028 there's an fe value followed by a lot of zeroes ("large gap"), so it's fair to suggest that's what we are looking for. I've calculated the address of the next page which should exist – that's the 3f byte at 0x2048 (which translates to memory pages at addresses 0x20000 - 0x26fff) – and checked in WinDBG if they exist (plus pages around them don't). WinDBG said I'm right.
What about the 28 c0 e8 03 80 fa ff ff bytes, which are just before the bitmap, but after the second magic? No idea. They didn't seem to be important for my purpose anyway.
To sum up, my reversed structure looked somewhat like this:
0x2000: "SDMPDUMPSDMP" magic value
0x200c: 4 bytes: start offset of pages
0x2010: number of pages total
0x2014: number of actually occupied pages
0x2018: number of pages total again ???
0x201c: "SDMP" magic value
0x2020: 8 bytes of no idea "FFFFFA8003E8C028h" ???
0x2028: start of bitmap (LSB first)
As a Volatility 2 vtype it would look like this:
{
    '_FULL_DUMP64_GYNVAEL' : [ 0x28, {
      'Signature' : [ 0x0, ['array', 12, ['unsigned char']]],
      'DataStart' : [ 0xc, ['unsigned int']],
      'NumberOfPages1' : [ 0x10, ['unsigned int']],
      'NumberOfUsed' : [ 0x14, ['unsigned int']],
      'NumberOfPages2' : [ 0x18, ['unsigned int']],
      'Signature2' : [ 0x1c, ['array', 4, ['unsigned char']]],
      'NoIdea' : [ 0x20, ['unsigned long long']],
      'Buffer' : [ 0x28, ['array', lambda x: (x.NumberOfPages1 + 7) / 0x8, ['unsigned char']]],
      'Buffer2' : [ 0x28, ['array', lambda x: (x.NumberOfPages1 + 31) / 32, ['unsigned int']]]
  } ],
}
As you can see I've actually started implementing Volatility 2 support during the CTF, but then I decided it would be faster to just convert the MEMORY.DMP file to a raw (linear / headerless) memory dump. This would save me debugging, as well as "proper" structure parsing. So here's the ad-hoc code for the converter:
with open("MEMORY.DMP", "rb") as f:
  d = f.read()

zeroes = bytearray(0x1000)

with open("MEMORY.RAW", "wb") as f:
  page = 0x27000
  offset = 0x2028
  for i in range(0x120000):
    byte = i // 8
    bit = i % 8

    if ((d[offset+byte] >> bit) & 1) == 0:
      f.write(zeroes)
      continue

    print("%16x  %16x" % (page, i * 0x1000))

    f.write(d[page:page+0x1000])
    page += 0x1000
There isn't much magic there – I've basically hardcoded the offsets and field values I've seen in the hexeditor, went through the bitmap bit by bit, dumped every page that existed and filled the space between with zeroes. The resulting file was of course much larger (4.5GB in fact, versus 252MB of the original).
One missing piece of the puzzle was to tell Volatility 2 where to look for the page table. Normally Volatility 2 would take it from the DirectoryTableBase field inside the _DMP_HEADER(64). However raw memory dumps don't have metadata headers, so one needs to pass this information via the command line. In my case I've actually read the value of cr3 register in WinDBG instead of just checking the DirectoryTableBase value in MEMORY.DMP – I somehow missed that it's there.
Final result:
$ python2 vol.py --profile Win7SP1x64 -f ../MEMORY.RAW --dtb=0x9bffa000 pslist
Volatility Foundation Volatility Framework 2.6
Offset(V)          Name                    PID   PPID   Thds     Hnds   Sess  Wow64 Start

------------------ -------------------- ------ ------ ------ -------- ------ ------ ----------------------------

0xfffffa80036ea040 System                    4      0     84      485 ------      0 2022-10-09 10:32:49 UTC+0000
0xfffffa8003f4c040 smss.exe                252      4      2       29 ------      0 2022-10-09 10:32:49 UTC+0000
0xfffffa800400f620 csrss.exe               332    324     11      475 ------      0 2022-10-09 10:32:58 UTC+0000
0xfffffa8004018b00 csrss.exe               384    376     12      141 ------      0 2022-10-09 10:33:00 UTC+0000
0xfffffa80040119b0 wininit.exe             392    324      6       89 ------      0 2022-10-09 10:33:00 UTC+0000
0xfffffa8005865060 winlogon.exe            428    376      7      133 ------      0 2022-10-09 10:33:00 UTC+0000
0xfffffa800589d350 services.exe            488    392     15      203 ------      0 2022-10-09 10:33:01 UTC+0000
0xfffffa80058b3500 lsass.exe               504    392     11      706 ------      0 2022-10-09 10:33:01 UTC+0000
0xfffffa80058b6240 lsm.exe                 512    392     10      148 ------      0 2022-10-09 10:33:01 UTC+0000
0xfffffa800591d940 svchost.exe             604    488     10      314 ------      0 2022-10-09 10:33:05 UTC+0000
...
By the way...
If want to improve your binary file and protocol skills, check out the workshop I'll be running between April and June → Mastering Binary Files and Protocols: The Complete Journey
Next step would be to add full support in Volatility 2, but I'm not sure that's actually still supported, so perhaps instead I should look at Volatility 3 and think if that would be useful there.
In any case, that's it!
Add a comment: